
There are few components that really tighten up the look of your vehicle –– and wheel spacers are one of them. Sure you can get a set of low or negative wheel offsets, but there’s no denying that wheel spacers are lighter on the wallet if you’re aiming for a similar aesthetic.
When you install wheel spacers correctly, they not only transform the way your car looks but also the way it performs. But as you may have guessed, installing wheel spacers the wrong way won’t just make your car look bad — but also dangerous to drive.
To save you from a bad situation, this guide is here to cover everything you need to know about installing wheel spacers correctly to make sure your car not only looks good, but is also safe!
Are Wheel Spacers Easy to Install?
When it comes to modifying cars — wheel spacers are incredibly easy to install. Of course, it’s only easy if you get the right wheel spacers.
The reason why wheel spacers are so controversial in the first place is that drivers usually get the wrong size, type, or buy cheap quality spacers which is a disaster waiting to happen.
If you make sure to double-check the fitment, installing them should be a breeze.
Which Wheel Spacer Is Right for You?
Wheel spacer safety is a whole other topic by itself, but in a nutshell –– hub-centric wheel spacers are the ones you want to install and lug-centric wheel spacers are the ones you want to stay away from.
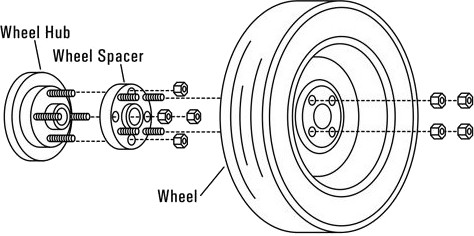
Hub centric wheel spacers get their name from their design –– the holes for the bolts and studs are right in the center of the spacer so that they perfectly align with the center of the hub.
This ensures that all the load from your car is evenly spread across the hub, which is what makes it safer than others.
If you’re planning to re-use an old set of lug-centric wheel spacers or for some reason you have to use them, definitely search for some wheel centering rings to pair them with. They only cost a few bucks and will make a world of difference.
Tools You’ll Need
Once you have the right spacers, you’ll also need the right tools by your side. If you care about safety, don’t make the wrong tool work –– that’s just an accident waiting to happen.
Instead, invest in a good mechanic’s tool set that has all the wrenches and socket sets to get the job done.
Keeping that in mind, below are the tools that you’ll need to install your wheel spacers safely:
- ⅜” torque wrench (at least 100-ft-lbs)
- ⅜” mechanic’s socket set (with sizes to fit your lug nuts)
- Tire iron OR ½” ratchet and socket set
- Low profile floor jack
- Two quality jack stands (verify weight capacity)
- Wheel chocks
- Wire brush
- Brake cleaner
On cars that have especially short wheel studs, you’ll also want to buy a longer set, as well as a wheel stud press tool. Both will make your car much safer.
Installing Wheel Spacers: A Step-by-Step Guide
When learning how to install wheel spacers, you need to look out for a few things right from the correct tool selection to torque specs.
It might seem a little daunting at first, but if you take everything one step at a time you’ll have your wheel spacers installed in a jiffy. Following this process will help you to be sure that your wheel balance isn’t thrown off in the process.
How to Install Hub-Centric Wheel Spacers
We focused on hub-centric wheel spacers here because lug-centric wheel spacers simply aren’t safe. Hub-centric wheel spacers, however, won’t give you a problem as long as you install them correctly.
Hub-centric wheel spacers that slip-on will be slightly more straightforward to install than ones that bolt-on because they simply slide over the existing lug nuts.
Keep in mind that learning how to install wheel spacers on a truck is no different from installing wheel spacers on a car — you’ll just need a larger car jack and jack stands to support the truck’s weight.
With that in mind, we’ll walk you through the right way to install your wheel spacers below.
Prep and Remove the Wheels
Start by finding a level surface to park your vehicle on. This is essential to safely raising and working on your vehicle. From there, loosen but don’t remove the lug nuts on your wheels that you plan to install the wheel spacers on.
Always do this one axle at a time. After loosening the lug nuts, place the wheel chocks around the wheel that you’re not lifting and jack up your vehicle using the car jack. Try to lift your car up from the center of its frame if possible.

Once you’ve lifted your car, install the jack stands and slowly lower the vehicle on them. Remove the car jack and give your car a few shoves to make sure that it’s firmly on the jack stands before working. Finally, finish removing the lug nuts and remove the wheels.
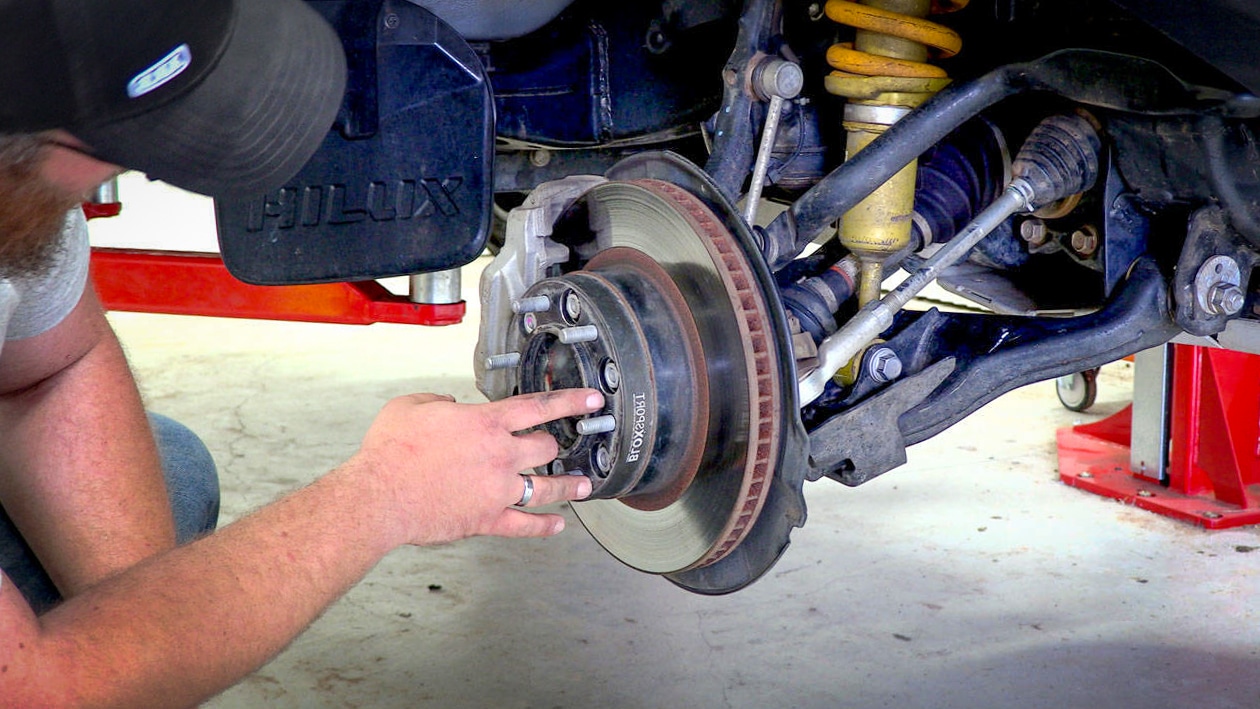
Prep and Install the Wheel Spacers
Once you have the wheels off, you need to prep the hub. Use your wire brush to clean off any imperfections so you get a smooth fitment. Once you’ve done that, go ahead and slide your wheel spacers over the existing lug nuts.
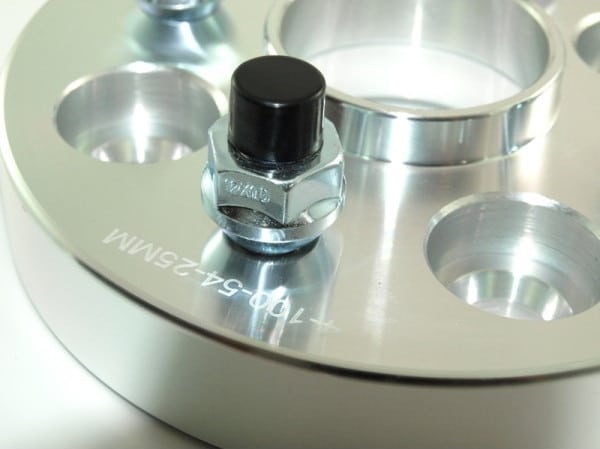
If you’re using a bolt-on wheel spacer, go ahead and hand tighten the spacer lug nuts at this point. Slip-on wheel spacers do not have these –– and you can move onto the next step once you have the wheel spacer firmly against the hub.
In both cases, check to be sure that you have enough thread for your spacers to be correctly secured. If you don’t have enough thread, purchase some longer wheel studs and an installation tool to press them into your wheel hubs.
Torque the Wheel Spacers and Reinstall the Wheels
If you have bolt-on wheel spacers, it’s imperative that you follow the directions that came with them and torque them down. Typically, this is about 90 ft-lbs, but check your specific wheel spacers for the correct torque specs.
When torquing the wheel spacer, make sure you use the same star pattern you would use when reinstalling the wheel.
Once you’ve torqued these lug nuts, reinstall the wheels and hand tighten the lug nuts until they’re firm against the hub.

Lower the Vehicle and Torque the Lug Nuts
Now you can safely raise the vehicle off the jack stands with the car jack, remove the jack stands, and lower the vehicle.
Finally, torque the lug nuts on the wheels using the manufacturer’s torque specs. Again, make sure that you use a star pattern when torquing the wheels. Otherwise, you risk having improperly torqued wheels.
Checking Up On Your Wheel Spacers
Our guide on how to install wheel spacers would be incomplete without mentioning a post-installation check. It might seem like a small thing, but it’s one of the most important things you can do.
Regardless of whether you followed all the steps above or done it a thousand times before –– you always need to make sure that everything works the way it should before you hit the street, track, or highway.
Inspecting your wheel spacers doesn’t call for much. Just walk around your vehicle and make sure that everything is even on each axle and that nothing has shifted out of place. From there, take a quick drive around the neighborhood and make sure that everything feels right.
Finally, take one last walk around your vehicle. If everything still looks right, you’re good to go.
Do you still have questions about how to install your wheel spacers, or do you follow a different process? Drop a comment below or check out some of the other guides for more great advice and insight.
2 comments
I am looking to install 1.25” hub centric spacers on my 2015 Silverado 1500. My questions are will the stock studs used to install the spacers interfere with wheel installation? Will I need to change the studs to shorter ones, shorten the studs by cutting them?
Thanks
I have spacers for my w203 one set is 15mm with a flange and one set is 12mm with no flange, which is front and which is rear, I would assume the 15 is the rear but think the flange would be best up front? Idk