

Camber is the most talked-about suspension angle within the car community. Some enthusiasts choose to tweak it for form while others need it for function.
People who change their wheel camber angle for aesthetic reasons often receive a lot of hate; they’re told that it damages their car, which is true, but not every car mod has to be practical — people can do whatever they want with their cars, it’s their choice.
In order to talk about camber without getting into a fistfight, it helps to avoid mixing the “aesthetic” discussion with the “functional” discussion.
These topics cannot share the same space without conflict unless the people discussing this have mutually agreed that the two styles are different and should be respected equally — which is probably not going to happen.
With that out of the way, let’s get right into it.
In this article, we’ll explore both positive and negative camber, why it’s necessary, and how to adjust it yourself. We’ll also try to rationalize the hype that surrounds “camber culture” and understand its place in the car scene.
What Is Camber?
Suspension geometry is the reason why cars feel and handle the way they do — without it, cars would be undrivable. The engineering that goes into suspension and steering design is close to sorcery.
If you look up “suspension geometry”, the most common words that’ll pop up on your screen will likely be camber, caster, and toe.
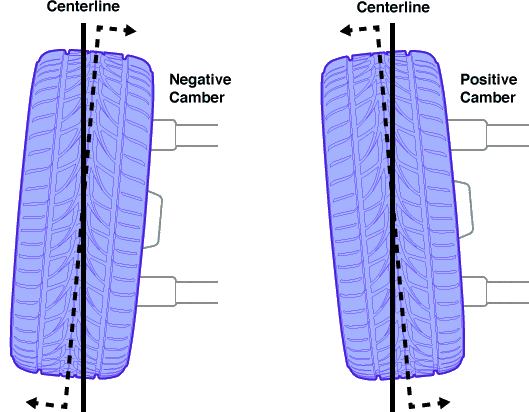
Camber is the angle at which the wheels and tires of a car stand relative to the road, assuming it’s perfectly horizontal.
To understand what camber is, look at your car from the front view, you’ll observe that the tires tilt either towards or away from the car. If the top of the tire is tilted away from the car, that’s positive camber, and if it is tilted towards the car, it’s called negative camber.
What Does Camber Do?
The wheel’s angle alters and manages the handling qualities of your suspension geometry by constantly placing the tires at a better angle on the road. The result:
- Evenly distributed load and pressure across all tires
- Significantly increased stability in any scenario. It could be daily driving, drifting, autocross, or off-road.
Camber works differently depending on how you set the angle (whether it’s positive or negative) and the type of suspension your car has. It can be adjusted to suit different driving styles.
Ideal wheel camber angles for different applications:
0° to -0.5°: Drag racing
-1° to -2°: Weekend canyon runs and spirited daily driving
-2° to -3°: Frequent track days and competitive use
-3° to -6°: Drifting
-7° to -10°: Aesthetic with controllable wheel damage
-10°+: Aesthetics, asking for wheel damage
These figures are only indicative. They’ll vary slightly, depending on your car’s suspension geometry and whether it is front-wheel driven or rear-wheel driven.

The most creative (functional) camber angles are on NASCAR race cars. Because of how the oval track maintains a single-sided, banked profile, racers use positive camber on one side and negative on the other. This is called cross camber.
Most vehicles have a slight amount of positive camber by default; this makes them easier to steer and more stable over bumpy roads. Negative camber, on the other hand, is used to help cars to grip the road better while cornering.
Now that you know what this suspension angle is and what it does, let’s talk about how it alters your steering feel.
Why Negative Camber?
The main point of using negative wheel angles is to make sure your tire has a flat contact patch with the road when you’re banking into a corner — it’s meant for race cars. Here’s how it works…
Look at a car when it’s at the apex of a tight turn; you’ll see cornering force doing its thing. This force is so strong that it causes the lead tire to heavily lean over itself.
When this happens, the inner section of the lead tire ends up doing most of the work (like you did during group projects at school) while the outer section of the same tire doesn’t do much. This is bad for three reasons:
- Compromised grip/traction when you need it the most
- Uneven tire wear
- Unpredictable steering mid-corner
This is where negative camber really helps; by presetting your wheels to tilt slightly inward at the top of the wheel, you’re preparing your car to deal with cornering force. With the right amount, you’ll have a nice and flat contact patch even during the hardest corners.

By adding negative camber, you’re optimizing your car for cornering grip, but you’re also losing straight-line grip. That’s why you’ll see that cars modified for drag racing don’t run negative camber whereas time attack cars do.
This is because circuit racing demands better grip while cornering as opposed to drag racing which only requires traction for the launch and during the straight-line run.
Why Positive Camber?
When it comes to the negative vs positive camber debate, negative usually steals the spotlight; hardly anyone talks about positive camber. This is because it’s rarely used and has very few applications.
Having positive camber will cause your car to pull to each side which makes it easier to steer and more stable on uneven terrain. This is why positive camber is commonly used for off-road vehicles.
It’s also seen on historic race cars where the suspension setups used to be softer. These cars would often see the nose-dive under braking.
As this happens, the camber goes from positive, to neutral and eventually negative, which these cars need to increase their contact patch during cornering.

Too Much Camber: Form vs Function
Negative camber can be extremely functional if set correctly. However, after the -6° mark, it stops being functional and enters the “aesthetic” territory.
We’ve seen some cars running crazy camber angles all the way from -10° up to a foolishly aggressive -20°! There’s one important reason why you cannot drive with angles like these — physics.
The main downsides of having excessive camber, other than being stereotyped, are that your straight-line traction and braking will be compromised; your car will follow cracks in the road, you’ll feel EVERYTHING, and your tires will show signs of excessive, uneven wear.
This begs a serious question; why do enthusiasts spend a ton of money and countless hours, figuring out all sorts of hacks, just to get the “cambered look”?
The answer is simple — it makes them happy.
It’s the same reason why you might want to spend your entire paycheck on something you’ve been wanting for a while; the same reason why you’d set your favorite image as your phone wallpaper, even if it makes the text under your app icons unreadable. And it’s the same reason why the stance guys slam their cars to the floor knowing full well that they’ll scrape over every speed bump.
Besides all that, having aggressive camber broadens your pool of options when it comes to wheel selection. It allows you to fit wide wheels over your fenders without rolling them; something that wouldn’t have been possible with a stock suspension set up.

Camber Culture: Demon Camber
Unless you’ve been living under a rock, you’re probably familiar with the stance community and all the hype that surrounds the hellaflush look. This style is inspired by the world of motorsports; it basically borrows design cues from race cars of the early days and takes them to the extreme.
This type of “extremist” styling culture originated in the land of the rising sun; Japan. Back there, there are three main criteria for how modified cars should look:
Hippari: Stretched tires
Tsuraichi: Tires neatly tucked inside the fenders
Onikyan: Cambered wheels
One of the first cars ever to adopt this look and dial it to the max was the Kawashima Celica at the Nagoya Exciting Car Showdown in 2012; the underground version of Tokyo Auto Salon.
Unsurprisingly, it received mixed reactions and before long, the popularity of “demon camber” shot up, and the style was embraced by many enthusiasts all over the world.
The closer we look at the car culture, its obsession with visual elements, and strong “guidelines” for how a car should look, the clearer it becomes that it is no less than an art. Look at Bosozoku cars for instance.
Pop art from the 50s, psychedelic art from the 60s, and minimalism from the 70s — these art movements influenced many aspects of design culture across the globe and are relevant even today. Sounds familiar? Something similar happens in the car scene.
No matter the niche, art functions similarly. It’s controversial, it gets criticized, but there’s no denying how beautiful it is to some eyes.
So if you’ve attracted haters because your car is modified in a certain way, don’t let it get to you. Whether we like it or not, people (especially on the internet) have opinions, and we cannot take that away from them.
Having haters is actually a good thing; it’s a sign that your build isn’t boring. Like we stated earlier, not everything has to be practical — it’s your car, you can do whatever you want with it.
Avoid going to extremes just because people say or think it is cool. If you genuinely love the style and you feel that it resonates with who you are, then go ahead with it. It’s important to be honest with yourself before investing in mods that will likely ruin your car.
At the end of the day, it’s about making it yours.
How to Adjust Camber Yourself
When it comes to adjusting camber, there’s no one size fits all approach. The required process and tools will depend on what type of suspension your car has, and whether or not it even supports front and rear wheel camber adjustments.
We’ve written an in-depth guide on how to adjust front and rear camber angles, but below we’ll walk you through the basics.
The catch with adjusting camber at home is that you’re going to have to double-check the alignment of your car after you’re done making changes (unless you’re 100% sure that you did everything right). If you’re going to end up at a professional alignment shop anyway, then you might as well use their services and get your camber angle set.
But that’s not nearly as fun as doing it yourself. Here’s everything you need to adjust camber yourself:
- Pyrometer
- Leveling Laser Gauge
- Camber Gauge
- Linoleum Blocks
- Grease
- Sheet Metal and car specific adjustment parts.
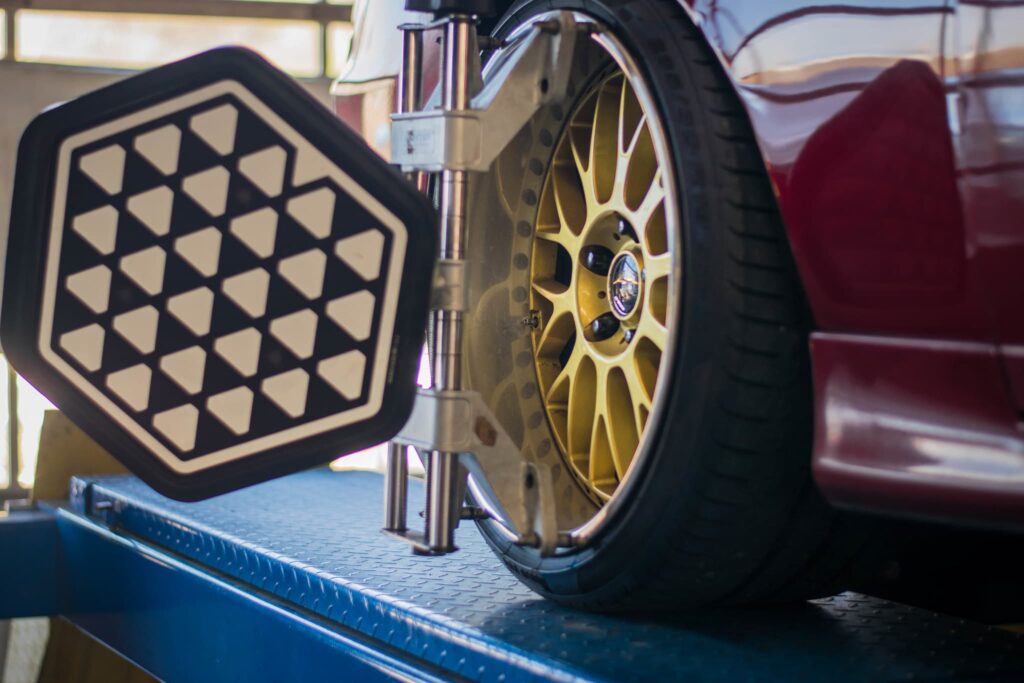
Figure Out How Much Camber You Need
The best way to gauge how much camber you should add is to first establish why you want to add some in the first place.
If show-car set up is what you’re after, then that’s a completely different story. But if you want functional camber, then you should start by measuring the temperature across your tires immediately after a few laps on the track or your usual route on the street.
If the outer part of your tire is a lot warmer than the inner part, then that’s a good indication that you need to add more negative camber. But, if the inner part of your tire is a lot warmer than the outside, it means that you could add some positive camber instead.
What you want is a nice and even temperature across both sides. The best way to do this is by using a pyrometer. You can also use an infrared temperature sensor but we find that it’s rather inefficient — it only measures the surface temperature of your tires whereas a pyrometer can read temperatures deep within the tire tread.
Set Up Your Car
To adjust your camber accurately, you’re going to design a make-shift wheel alignment setup. Luckily, this can be done without expensive level beams.
First things first; disassemble, lubricate and reassemble all the bolts that you’re going to use to adjust the camber. This will make your suspension easier to fine-tune without struggling with tight bolts.
Start by leveling your car. To do this, you’re going to have to make a small contraption for your car to sit on. Doing this is necessary because garage floors aren’t usually leveled perfectly.
You’re going to need to sandwich two linoleum tiles together with plenty of grease between them. Make 4 pairs, one under each wheel. These will act as spin plates which will enable your tires to move as you make adjustments — this is necessary because your car won’t be jacked up during the process; the tires will bear full weight.
Once this is done, use your laser level to check which wheel needs more height and add stacks of sheet metal or a wooden plank under the linoleum sandwiches as needed.
When your car is sitting on your newly constructed level shims, make sure your parking brake is on. Be sure to manually bounce the suspension, this will help to settle everything so you can get consistent readings.
Then finally, you can use the gauge to measure the angle of your wheel and proceed to set your angles.
Get the Right Camber Adjustment Parts
To add or remove camber, you can use different parts depending on your suspension type. The most popular parts include:
Camber Plates: Allow 2° to 3° of camber settings
Camber Bolts: Allow up to 1.5° of adjustment
For anything more than this, you’re going to need adjustable control arms. Stock suspensions rely on eccentric bolts, eccentric washer bolts, turn-buckle joints, or shims.
Camber bolts can be used on double wishbone and multi-link independent suspension to move the upper or lower control arms. On McPherson strut suspension systems, these can be used to adjust the lower control arm or the steering knuckle.
Turn-buckle joints are usually used for rear multi-link suspensions but are also found on front wishbone suspensions.
Clearly, adjusting camber is very car specific and there’s a lot that can go wrong. So do your research, talk to enthusiasts who own the same car, and make sure you buy the right parts.
What suspension geometry do you run on your car? Let us know in the comments below!