

Replacing your car’s rims is one of the easiest ways to transform your vehicle’s entire look. But while it’s a relatively easy swap, you’re going to run into a whole host of problems if you get the wrong set.
Sure, style matters but the most important part of the process is finding the correct size. In a worst-case scenario, you won’t even be able to mount them to your car.
But even if they do bolt on, the wrong size can mean your existing tires won’t fit, can completely change your suspension geometry, require rolling your fenders, or cause damage to your car while driving.
To make things easier, this guide will walk you through everything you need to know about your car’s rims. After you read this article, you won’t only know how to read rim size, but if it’s not written anywhere, you’ll also learn how to measure the size of your car’s rims.
Why Is It Important to Measure Rims?
There are a few different reasons why it’s so important to check rim dimensions, and they all revolve around fitting your car correctly. With the wrong size rims, you might not be able to mount them to your vehicle.
Even if your rims fit, you might not have enough clearance to clear your brake calipers, suspension components, your car’s chassis, or the fenders. Either way, you’re risking serious problems.
When you order a new set of tires you’ll need the correct tire size, most of which relates to the size of your rims. If you don’t know this size, you once again risk having a bad setup, have trouble installing and keeping your tire on the rim, or they will never be able to be mounted at all.
Luckily if you know how to tell what size rims you have and how to read wheel sizes, it’s a pretty easy problem to avoid.
Reading Rim Dimensions
Depending on which part of the world you live in, you’ll see people using different measurement units when it comes to car wheels. Whether you’re installing hub centric or wheel centering rims, you’re going to want to know how the sizes are denoted.
To know every important measurement on a rim, you’d need to look at a spec list that includes stuff like hub bore, backspacing, bolt pattern, PCD (Pitch Circle Diameter), and more.
Typically, to make things easier and to save time, the bare minimum measurements such as diameter, wheel width, and offset are strung together to denote the size of your rims. Here’s how:
Diameter (inches) x Width (inches) +/- Offset (millimeters) Bolt Pattern
For example, if you’re looking at this specific set of Konig Hexaforms, the size could be written as:
15×7.5 +35 4×100 OR 15×7.5 ET35 4×100
ET, which stands for einpresstiefe, is an alternative way to denote wheel offset.
How to Measure Rim Size: A Step-by-Step Guide
When you’re learning how to measure rim size and bolt patterns on a car, there are four main measurements that you need to take. They’re all equally important, even if they’re not all equally thought about.
We’ve highlighted each measurement below and broke down how to take it — that way, when you’re going to order your new rims, you have everything you need to get it right the first time.
Measuring the Diameter
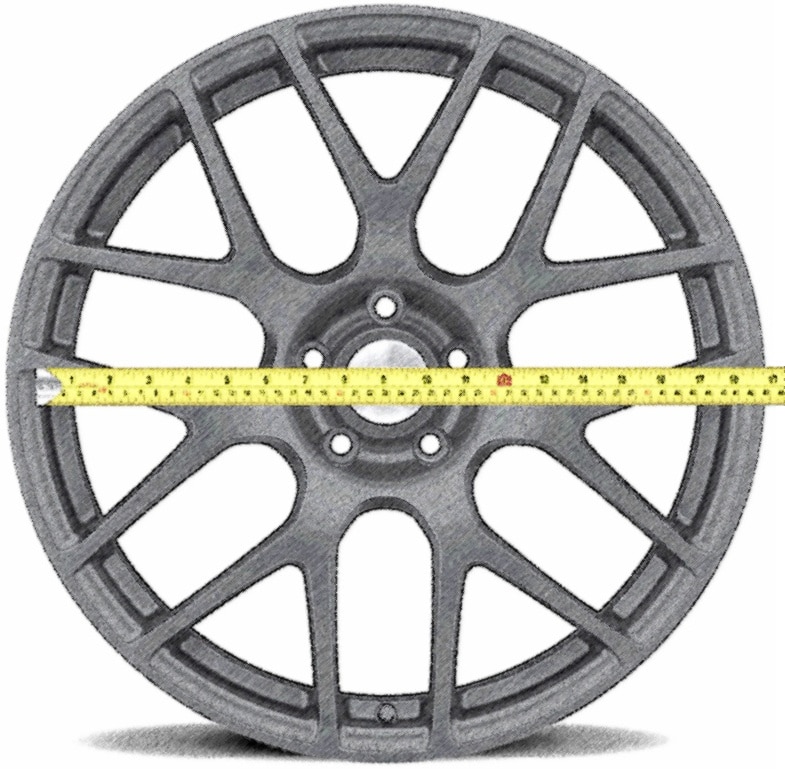
The first measurement you need to make when measuring rims is the diameter. The diameter refers to one bead seat area directly across the tire to the other bead seat area. If you cut across the front of the rim (the part you see when you mount the tire onto the vehicle), you get the diameter.
When taking diameter measurements, use inches — and always make sure that you’re directly on the other side when measuring the rim.
Measuring the Width
When you measure the rim’s width, you also want to measure from the bead seat area to the other bead seat area — except you want to measure across the side of the tire instead of the front.
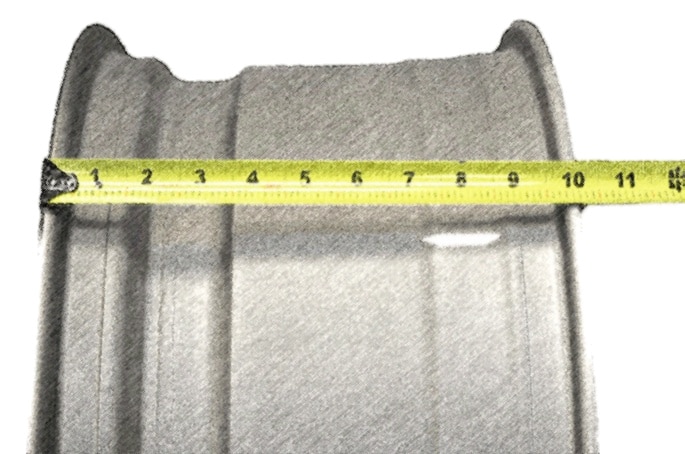
Don’t confuse the bead-to-bead area with the entire width of the wheel. You’re measuring where the actual tire bead sits — which is on the inside of the rim, not the outer lip. This is the part of the rim that the tire sits on.
Calculating the Bolt Pattern and Spacing
One of the more complicated measurements you’ll encounter is the bolt or stud pattern and spacing. While you may be tempted to skip this step and just go by the first two measurements — it’s best to just see the job through. Otherwise, you won’t be able to mount your rims onto your vehicle.
The first thing you need to do is count the number of bolt holes. This is the simple part, and the answer is either 4, 5, 6, or 8. Most passenger vehicles use a 5-bolt pattern.

From there, you need to measure the distance between the openings. For 4, 6, and 8 stud patterns, you measure from the middle of one stud to the middle of the stud directly opposite it. Take this measurement in millimeters.
For wheels with 5 holes, measure from the middle of one bolt to the end of another bolt on the opposite side. Once again, this measurement is in millimeters.
Usually, you will see this marked as:
Number of Bolt Holes x Distance to Bolt Hole on the Opposite Side
As an example, the stud pattern for Nissan 350z wheels is written: 5×114.3.
Be aware that in some countries, this is called a lug pattern, and the industry term is Pitch Circle Diameter or PCD for short.
Adjusting for Offset and Backspacing
A critical part of learning to measure a car’s rims is learning how to adjust for wheel offset and backspacing. Both of these are two separate measurements, but they both refer to making sure that you have enough space for your vehicle’s braking components in addition to how far out your rims sit.
For offset, you need to start with the rim’s actual width — not just the bead-to-bead width measurement. This measurement is a little easier to take because all you need to do is put one end of your tape measure on the outer lip and pull it directly across to the other side.
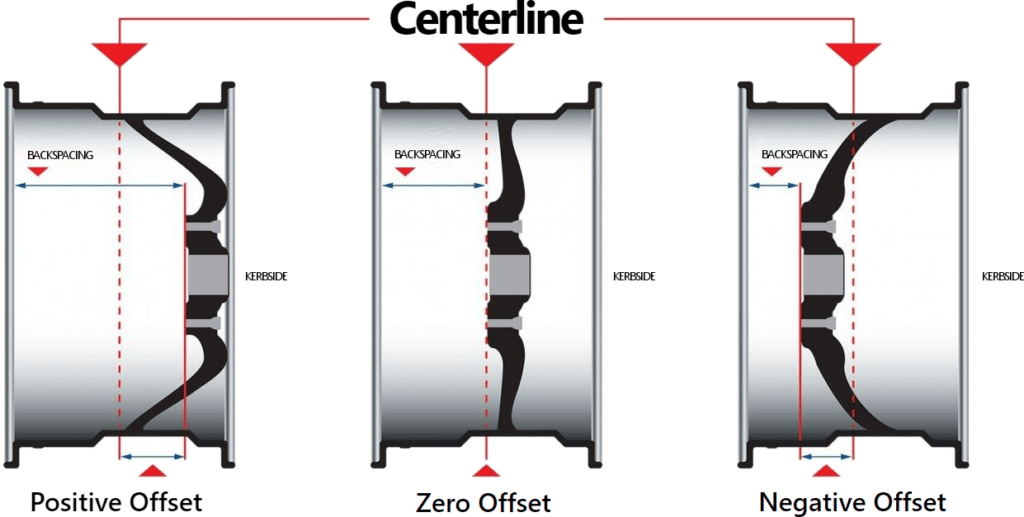
From there, you need to determine your rim’s backspacing. Place your rim face-down with the inner side of the rim facing up. Measure from the point where the hub mounts aka the hub mounting pad, to the topmost lip — known as the inboard flange. This is your rim’s backspacing.
Subtract half of the width of your rim from the backspacing to determine your wheel’s offset. Keep in mind that you usually measure offset in millimeters.
Final Thoughts
By now it’s pretty clear that when it comes to determining wheel size, you can’t just take a shot in the dark. Whether you’re chasing a staggered setup or simply need replace your OEM rims that have been damaged — without the right measurements your fitment will be a nightmare.
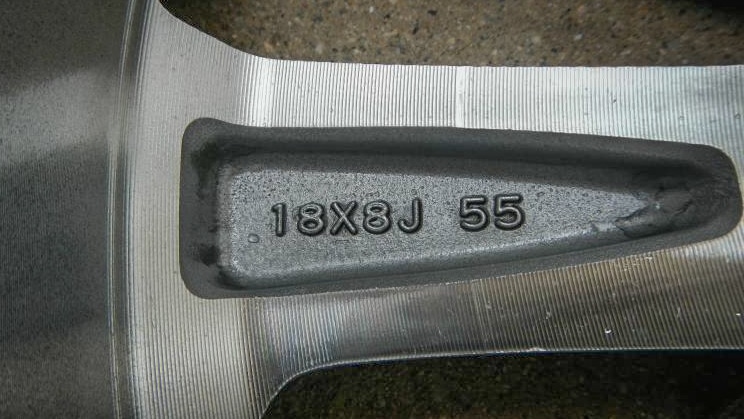
And while you could just choose to go with the stamped sizes mentioned at the back of your rim’s hub, it won’t always specify backspacing or offset — which are equally important.
It might seem a little daunting at first, but once you’ve done it a time or two, it gets a whole lot easier.
What are your thoughts on measuring wheel sizes? Drop a comment below and tell us what worked for you, or if you have any questions about reading the size of your rims.